Wednesday, March 11, 2015
Integrating Balsamiq Mockups with Google Drive
Editor’s Note: This blog post is authored by Peldi Guilizzoni, from Balsamiq. As a user of Balsamiq myself, it was great to see them join as one of the first Drive apps! -- Steven Bazyl
Hi there! My name is Peldi and I am the founder of Balsamiq, a small group of passionate individuals who believe work should be fun and that lifes too short for bad software.
We make Balsamiq Mockups, a rapid wireframing tool that reproduces the experience of sketching interfaces on a whiteboard, but using your computer, so they’re easier to share, modify, and get honest feedback on. Mockups look like sketches, so stakeholders won’t get distracted by little details, and can focus on what’s important instead.
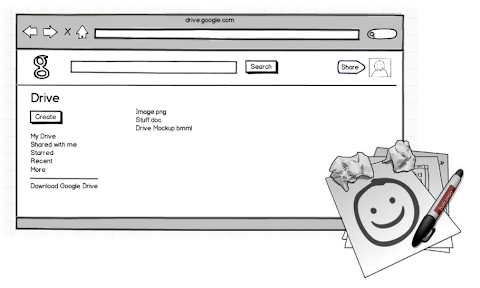
We sell Mockups as a Desktop application, a web application and as a plugin to a few different platforms. An iPad version is also in the works.
We believe that tools should adapt to the way people like to work, not the other way around. Thats why when Google Drive came out, we jumped at the chance to integrate Mockups with it. This is the story of how the integration happened.
First of all, a little disclaimer. Although my job these days is to be CEO and all that, I come from a programming background. I started coding at 12, worked at Macromedia/Adobe for 6 years as a programmer. Id say Im a pretty good programmer…just a bit rusty, ok? I realize that the decision to write the code for Mockups for Google Drive myself instead of asking one of Balsamiqs better programmers to do it might have been a bit foolish, but we really wanted to be a launch partner and the programmers were already busy with lots of other stuff, plus I didnt want to pass up on the chance to work on something cool after dinner for a while. ;) OK so now you know the background, lets get started.
Once I got access to the Google Drive API documentation and looked around a bit, I started by following the detailed "sample application" tutorial.
The sample was written in python, used OAuth, the Google API Console, and ran on Google App Engine, all technologies I hadnt been exposed to before.
Following along brought me back to my childhood days of copying programs line by line from PC Magazine, not really understanding what I was doing but loving it nonetheless. :)
The trickiest part was figuring out how OAuth worked: its a bit of a mess, but after you play with it a little and read a few docs, it starts making sense, stick with it, its the future! ;) Plus the downloadable sample app had hidden all that stuff in a neat little library, so you dont have to worry about it so much.
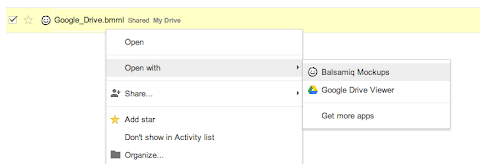
Setting up the sample application took around 2-3 hours, easy peasy. Once that was done, I just had to convert it to become Balsamiq Mockups for Google Drive. Because I had done this before for other platforms, this was finally something I was comfortable with doing. The bulk of our code is encapsulated into our Flash-based Mockups editor, so all I had to do was to write a few functions to show the editor to the user and set it up using our internal APIs. Then I had to repurpose the "open with" and "edit" APIs from the sample app to work with the Mockups editor. All and all, this took maybe a day of work. Yay!
Once the proof of concept was up, I started turning the code into a real app. I cleaned up the code, added some comments, created a code repository for it in our bazaar server, set up a staging environment (a parallel Google App Engine application and unpublished Chrome Web Store listing) and integrated the build and deployment into our Jenkins server.
One tricky bit worth mentioning about integrating with Jenkins: the Google App Engine deployment script appcfg.py asks for a password interactively, which is a problem if you want to deploy automatically. The solution was to use the echo pwd | appcfg.py trick found here.
After some more testing and refinements, shipping day came, Balsamiq Mockups for Google Drive was live.
It was a very exciting day. Getting mentioned in the official Google blog was quite awesome. The only stressful moment came because for some reason my Google App Engine account was not set up for payments (I could have sworn I had done it in advance), so our app went over our bandwidth quota an hour after launch, resulting in people receiving a white blank screen instead of the app. Two people even gave us bad reviews because of it. Boo! :(
In the days that followed, things went pretty well. People started trying it out, and only a few bug reports came. One very useful Google App Engine feature is the "errors per second" chart in the dashboard, which gives you an insight on how your app is doing.
I noticed that we had a few errors, but couldnt figure out why. With the help of the docs and our main Developer Relations contact at Google, we narrowed them down to a couple of OAuth issues: one was that the library I was using didnt save the refresh_token properly, and another that had to do with sessions timing out when people use the editor for over an hour and then go to save their work.
Fixing these bugs took way longer than what I wanted, mostly due to the fact that Im a total OAuth and Python n00b.
After a few particularly frustrating bug hunting sessions, I decided to rewrite the backend to Java. The benefits of this approach are that a) we get static type checking and b) I can get help from some of our programmers since Java is a language were all already familiar with here.
Since by now the Java section of the Google Drive SDK website had been beefed up, the rewrite only took a day, and it felt awesome. Sorry python, I guess Im too old for you.
The hardest part of the java rewrite was the Jenkins integration, since the echo pwd trick doesnt work with the java version of appcfg. To get around that, I had to write an Expect script, based on this Fábio Uechi blog post. By the way, I would recommend reading the Expect README, it has an awesome 1995 retro feel to it.
Overall, integrating Balsamiq Mockups with Google Drive was a breeze. Google is a technology company employing some of the brightest people in our industry, and it shows. The APIs are clean and extremely well tested. The people at Google are very responsive whenever I have an issue and have been instrumental in making us successful.
While the application is still pretty young - we are working on adding support for Drive images, linking, symbols… - we are very happy with the results were getting already. The Drive application netted around $2,500 in its first full month of operation, and sales are growing fast.
Alright, back to coding for me, yay! :)
Peldi
 | Peldi Guilizzoni Giacomo Peldi Guilizzoni is the founder and CEO of Balsamiq, makers of Balsamiq Mockups. Balsamiq is a tiny, ten-person multi-million dollar company with offices in 4 cities around the World. A programmer turned entrepreneur, Peldi loves to learn and to share what he learns, be it via his blog, giving talks or mentoring other software startups. Follow him on Twitter @balsamiq. |
Monday, March 9, 2015
More opportunities to Hangout with the Google Apps developer team in 2011
Weve held many Office Hours on Google+ Hangouts over the last two months, bringing together Google Apps developers from around the world along with Googlers to discuss the Apps APIs. Weve heard great feedback about these Office Hours from participants, so weve scheduled a few more in 2011.
General office hours (covering all Google Apps APIs):
- TODAY: December 8 @ 10:00am PST
- December 14 @ 1:30pm PST
- December 20 @ 12:00pm PST
Product-specific office hours:
- Google Apps Marketplace - December 12 @ 12:00pm PST
As we add more Office Hours in the new year, well post them on the events calendar, and announce them on @GoogleAppsDev and our personal Google+ profiles.
Hope you’ll hang out with us soon!
 | Ryan Boyd profile | twitter | events Ryan is a Developer Advocate on the Google Apps team, helping businesses build applications integrated with Google Apps. Wearing both engineering and business development hats, youll find Ryan writing code and helping businesses get to market with integrated features. |
Sunday, March 8, 2015
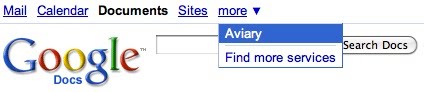
Integrating with Google Docs Aviary experience
Aviary is a multimedia editing suite that lets people edit and retouch images, create logos, markup screen shots and even edit audio. Aviary is available on the Google Apps Marketplace, and can be accessed right from the Google Apps navigation bar.
One of the feature Aviary built as part of this integration with Google Apps was letting users save their Aviary creations to their Google Docs account. Integrating Aviarys suite of editors and their associated files into Google Docs was a terrific challenge for the team. Google provided Aviary with a great initial set of APIs to let Google Apps users navigate to and launch Aviary from within their universal navigation.
Users could retrieve Google Docs files within the Aviary editors once they were launched (via the DocList API). However, Aviary found that although saving the files to Docs was easy, there was no way to associate an Aviary editor to a specific file type (i.e. jpg) and make it launch Aviarys editors directly from inside Googles interface.
Focusing on the User Experience
Aviary wanted a way to make the experience truly seamless for Googles users. Having separate areas to manage Aviary files and Google Docs was a less than ideal user experience. Add in the fact that many more third party apps will be launching in Googles marketplace and the end result would be an organizational nightmare for users trying to remember where all of their files were stored.
Keeping things in one universal interface was imperative, but there was no native API for that yet. So to protect the user experience in the interim, Aviary needed to come up with a novel work around. Fortunately, there was a simple and elegant way.
Because Google does allow creating new native Documents using the DocumentService.Insert method of the DocList API, Aviary was able to create "stub documents" with private references to the actual Aviary document inside of them. Each stub document contains a thumbnail of the final image and a private (but shareable) URL that launches the Aviary editor with the original editable Aviary ".egg" file inside of it (".egg" is our native file format - it seemed apropos for Aviary).

Another benefit of this approach is that it allows Aviary to work with Google Apps Standard accounts which ordinarily do not allow the uploading of arbitrary custom file types, (unlike the Google Apps Premier accounts which do).
Collaboration Management
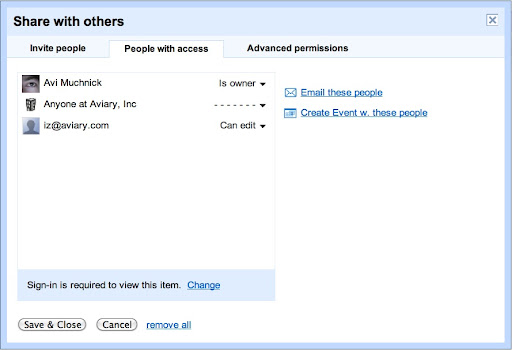
Best of all, routing the file through Google Docs means that managing permissions on who can edit and see the document is as simple as managing permissions on any Google Document. Aviary didnt need to reinvent the wheel.
Presentation of Aviary files within Google Docs
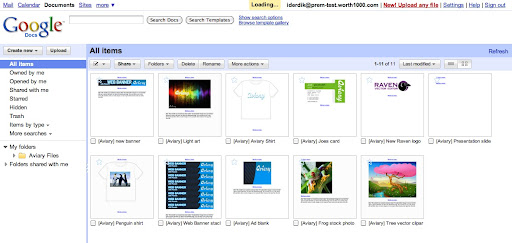
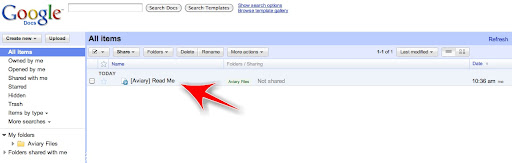
Aviary is a suite of design applications that are mostly design oriented although they do have audio editing capabilities as well. This means that most files created in Aviary are visual in nature. Browsing through a list of file names when looking for a visual file can be inefficient - but just by sticking with some of Googles native functionality worked well. Googles Docs list has a little-known Grid view button, which displays Google Docs using a grid of thumbnails.
Grid view gives the user a visual thumbnail preview of the contents of their Google Docs - including the stub documents we made. Perfect for finding Aviary files!
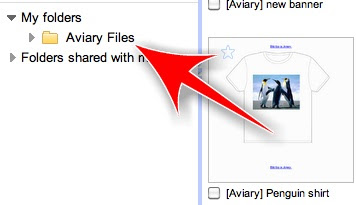
Document Organization
To make things simpler to find and organize, all of the stub files are in an Aviary folder by default. To facilitate file and folder management, Aviary wrapped the Gdata classes provided by Google with an Aviary helper class that provided all of the functionality needed to create folders, upload and replace files. Within this class, Aviary used the DocumentService.Insert method of the DocList API to add an AtomEntry with a category of "folder" to create this base folder.
One additional thing Aviary did was to automatically create a Help File in a users Google Docs list the very first time an Apps user clicks on the Aviary link in Googles universal navigation. This help file contains an overview of the different Aviary editors that are available and some tips on how to use them. Aviary used the same DocumentService.Insert method of the DocList API to create this help document that was used to create the stub documents. Aviary sends the user a one-time summary email with the contents of this help file to make sure they can find the answers they need in the future.
When put all together, we now have a workable application that integrates smoothly with Google apps, giving all Apps users complete access to Aviarys multimedia editing suite. The more developers build on Googles Apps platform, the more useful it is to users, and the more everyones apps are used as a result.
Want to weigh in on this topic? Discuss on Buzz
Monday, February 16, 2015
Reprojecting a shapefile with GDAL OGR and Python
The code below is an adjustment of homework 2b in the page above for my case.
I tried to add explanations to the original code so that its easy to follow by just reading it -- hope Im right....
# -*- coding: utf-8 -*-
# Import Modules
import ogr, osr, os, sys
# set file names
infile = C:UsersmaxDocumentsIcechartsDataIceChart_2012ice20120608.shp
outfile = C:UsersmaxDocumentsIcechartsDataIceChart_2012ice20120608_epsg3575.shp#get path and filename seperately
(outfilepath, outfilename) = os.path.split(outfile)#get file name without extension
(outfileshortname, extension) = os.path.splitext(outfilename) #get file name without extension
# Spatial Reference of the input file# Access the Spatial Reference and assign the input projection
inSpatialRef = osr.SpatialReference()
inSpatialRef.ImportFromEPSG(4326) # unprojected WGS84
# Spatial Reference of the output file# Access the Spatial Reference and assign the output projection# UTM 33N which we use for all Spitsbergen does not work since area too far# outside UTM 33
outSpatialRef = osr.SpatialReference()
outSpatialRef.ImportFromEPSG(3575) # EPSG:3575: WGS 84 / North Pole LAEA Europe
# create Coordinate Transformation
coordTransform = osr.CoordinateTransformation(inSpatialRef, outSpatialRef)
# Open the input shapefile and get the layer
driver = ogr.GetDriverByName(ESRI Shapefile)
indataset = driver.Open(infile, 0)
if indataset is None:
print Could not open file
sys.exit(1)
inlayer = indataset.GetLayer()
# Create the output shapefile but check first if file exists
if os.path.exists(outfile):
driver.DeleteDataSource(outfile)
outdataset = driver.CreateDataSource(outfile)
if outfile is None:
print Could not create file
sys.exit(1)
outlayer = outdataset.CreateLayer(outfileshortname, geom_type=ogr.wkbPolygon)
# Get the FieldDefn for attributes ICE_TYPE and ID and add to output shapefile# (which i know are in my file)
feature = inlayer.GetFeature(0)
fieldDefn1 = feature.GetFieldDefnRef(ICE_TYPE)
fieldDefn2 = feature.GetFieldDefnRef(ID)
outlayer.CreateField(fieldDefn1)
outlayer.CreateField(fieldDefn2)
# get the FeatureDefn for the output shapefile
featureDefn = outlayer.GetLayerDefn()
#Loop through input features and write to output file
infeature = inlayer.GetNextFeature()
while infeature:
#get the input geometry
geometry = infeature.GetGeometryRef()
#reproject the geometry, each one has to be projected seperately
geometry.Transform(coordTransform)
#create a new output feature
outfeature = ogr.Feature(featureDefn)
#set the geometry and attribute
outfeature.SetGeometry(geometry)
outfeature.SetField(ICE_TYPE, infeature.GetField(ICE_TYPE))
outfeature.SetField(ID, infeature.GetField(ID))
#add the feature to the output shapefile
outlayer.CreateFeature(outfeature)
#destroy the features and get the next input features
outfeature.Destroy
infeature.Destroy
infeature = inlayer.GetNextFeature()
#close the shapefiles
indataset.Destroy()
outdataset.Destroy()
#create the prj projection file
outSpatialRef.MorphToESRI()
file = open(outfilepath + \+ outfileshortname + .prj, w)
file.write(outSpatialRef.ExportToWkt())
file.close()
#end


Sunday, February 15, 2015

Friday, February 13, 2015
Hulk 1 for PC full version with system requirements

Review
Adapting a board game for the PC is a tough task. Developers are faced with two big questions. Do we play it straight and narrow and just port the basic game? Or do we take advantage of all that the computer has to offer and rev things up with glitzy graphics and new features? You either play up to diehard fans who want nothing but a buttoned-down tribute or go after a wider audience that wants something more involved than the pixelated rehashing of an experience best had on the dining room table.
Full Control Studios went with the "straight and narrow" option in its take on the classic cardboarder Space Hulk. This version of the legendary Games Workshop release from the late 1980s is so locked into re-creating the ancient original that you might as well have dug the game out of a time capsule. The tension and strategic challenge that the original game did so well have weathered the years just fine, proving that the age-old Warhammer 40,000 battle between space marines and rampaging aliens is as compelling today as it was nearly 25 years ago. But the simplistic gameplay lacks the complexity and replayability of contemporary squad-based tactical sims, and the bottom-drawer production values are hardly befitting of such a great license. There is something dissatisfying about most everything here.
Still, this is Space Hulk. It may seem a little cheap, but all of the core elements of the board game are here. You get most of what was included in the box when the first edition hit stores in 1989. Whats here also closely resembles the two Space Hulk games that were released for both the PC and consoles back in the mid-90s. This is still a tactical game pitting the genetically augmented space marines of the Blood Angels chapter against hordes of Genestealer aliens who populate a mass of spaceship garbage, known as a space hulk, roaming the treacherous Warp. Read more
System requirements:
Windows 2000/XP
Intel or AMD 2.0GHz Processor
512MB RAM
1.8GB Hard Disk Space
DirectX 9.0
128MB DirectX Compatible Video Card
DirectX 9.0c Compatible 16-Bit Sound Card
8X DVD-ROM Drive
Screen Shots: Click on the image to view large
.jpg) | 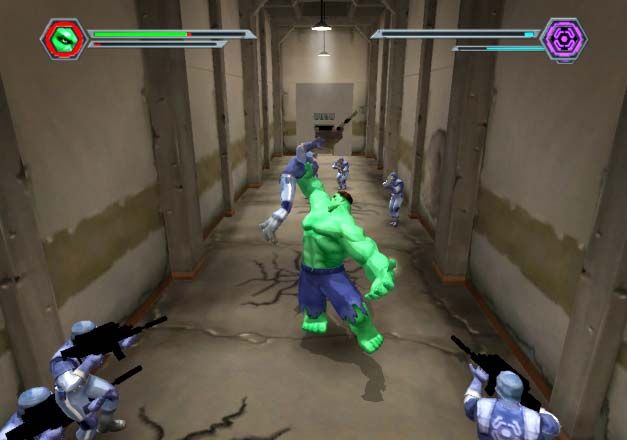 |  |

Thursday, February 5, 2015
Deliver great presentations with Presenter view
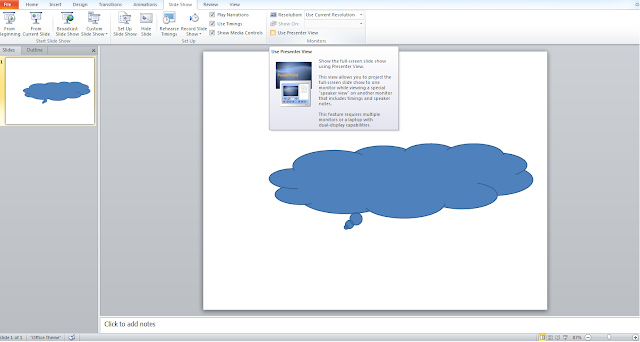
You just need to connect your laptop to another monitor/projector and select the option "Use presenter view" from Slide Show tab before you go for slide show mode of presentation. Presenter view is surely gonna help you deliver one of those effective presentations.
Here is a quick video which explains it all:
New iPad Mini with Retina Display announced by Apple Review

Billion Apple lovers are waiting for iPad Mini with Retina display .